Install FreeBSD (Short and Sweet Version)
Part of the “FreeBSD on a Laptop” series.
The FreeBSD Handbook has an extensive chapter on installing FreeBSD that covers a wide range of scenarios with descriptions of each possible choice. Its an invaluable resource maintained by volunteer contributors.
After performing a few installs, these are my personal notes of steps taken and choices made. A “short and sweet” version of the above Handbook.
1. Start Here
Throughout this guide, if you see square brackets [] in code blocks, that means the word of code (square brackets included) should be replaced with something else. This is detailed in the instructions before or after the code block.
FreeBSD will be installed as the sole operating system on a single disk using the ZFS file system with encryption.
A few assumptions:
- Target device is
amd64architecture using UEFI to boot. - Network access during install uses a wired interface
Acquire an installation image
As of March 2026 the latest release is FreeBSD 15.0-RELEASE.
Download FreeBSD-15.0-RELEASE-amd64-memstick.img and the CHECKSUM file for verification:
wget https://download.freebsd.org/releases/amd64/amd64/ISO-IMAGES/15.0/FreeBSD-15.0-RELEASE-amd64-memstick.img
wget https://download.freebsd.org/releases/amd64/amd64/ISO-IMAGES/15.0/CHECKSUM.SHA512-FreeBSD-15.0-RELEASE-amd64
Verify the integrity of the image by running:
sha512sum -c --ignore-missing CHECKSUM.SHA512-FreeBSD-15.0-RELEASE-amd64
Prepare the USB installation medium
Write the installer to an unmounted USB storage device running the dd command as root.
WARNING
Be very careful to note the proper device (which can be identified with lsblk). All contents on the device will be lost!
Example: On a Linux system, if a USB stick appears as sdx1, then write the installer to sdx (omit partition number):
sudo dd if=FreeBSD-15.0-RELEASE-amd64-memstick.img of=/dev/sda bs=4M conv=fsync oflag=direct status=progress; sync
2. Installation
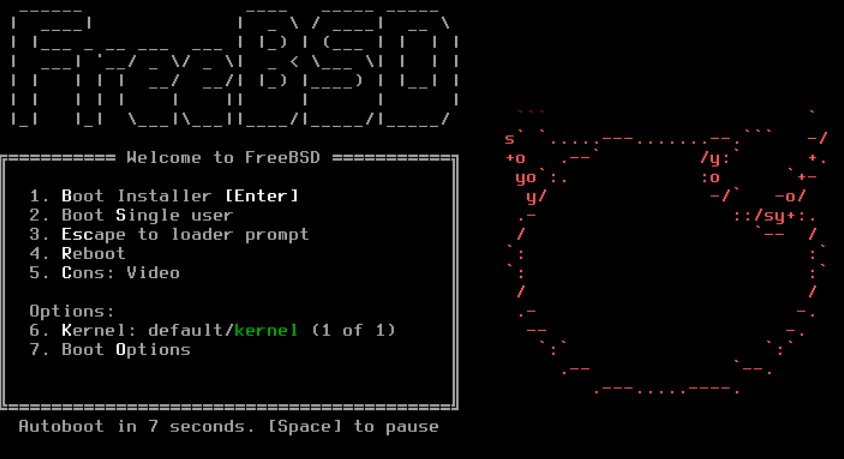
Boot target device from the install media. In the FreeBSD Boot Menu press <Enter> to launch the installer.
Steps
- Welcome:
Install - Keymap Selection: Default is standard
USkeyboard map. Press<enter>to continue or select an alternative from the list. - Set Hostname:
[new_name_for_device].home.arpa# example:foobox.home.arpa - Set Installation Type:
Packages (Tech Preview) - Network or Offline Installation:
Network - Network Configuration:
[ethernet interface]andAuto# example: Intel network deviceem0 - Partitioning:
Auto (ZFS) Guided Root-on-ZFS - ZFS Configuration:
- Pool Type/Disks:
stripe: 1 disk#[*] ada0for SATA and[*] nda0for NVME - Pool Name
zroot - Force 4K Sectors?
YES - Encrypt Disks?
YES - Partition Scheme?
GPT (UEFI) - Swap Size
16g - Mirror Swap?
NO - Encrypt Swap?
YES - Select
>>> Install Proceed with Installation - Select
YESto destroy current contents of target disk - Enter encryption passphrase. Retype to confirm.
- Pool Type/Disks:
- Select System Components:
[x] base[*] kernel-dbg[*] lib32
- Set root password. Retype to confirm.
- Time Zone Selector:
[region]# example:America - Canada - Eastern - ON & QC (EDT) - Time and Date:
- Date:
Skip - Time:
Skip# NTP will set on reboot
- Date:
- Services to be started at boot:
[*] sshd[*] ntpd[*] powerd# for laptops[*] dumpdev
- System hardening:
[*] clear_tmp
- Firmware installation:
[package(s)]# install packages if available - Add user account?
Yes- Username:
[username]# example:foo - Full name:
<enter> - Uid:
<enter> - Login group:
<enter> - Other groups?:
wheel - Login class:
<enter> - Shell:
<enter> - Home directory:
<enter> - Home directory permissions:
<enter> - Enable ZFS encryption?
no# encrypted Root-on-ZFS already enabled - Use password-based authentication?
<enter> - Use an empty password?
<enter> - Use a random password?
<enter> - Enter password. Retype to confirm.
- Lock out account after creation?
<enter> - OK?
<enter> - Add another user?
<enter>
- Username:
- Final configuration:
Finish Apply configuration and exit installer - Manual configuration:
No - Complete:
Reboot
NOTE
When prompted for the encryption passphrase - regardless of the keymap set during install - enter the correct passphrase referencing the US keymap:
GELI Passphrase for <disk>:
Upon success, boot resumes….
FreeBSD/amd64 (foobox.home.arpa) (ttyv0)
login: root
Password:
Welcome to FreeBSD!
To shutdown/poweroff the system:
shutdown -p now
Next: After the First Boot
You can like, share, or comment on this post on Mastodon 💬
» Next: FreeBSD: After the First Boot
« Previous: Configure SSH on Linux for Passwordless Logins to Servers