Virtualization Using KVM + QEMU + Libvirt
Setup a stack of virtualization tools on a Linux Mint (Debian Edition) host for creating and managing virtual machines (VMs).
- 1. Install
- 2. Directories
- 3. Permissions
- 4. Create VM
- 5. Resize VM guest window
- 6. Video Acceleration
- 7. Virsh and virt-clone
- 8. Resources
1. Install
KVM (Kernel-based Virtual Machine) is built into the Linux kernel and handles the CPU and memory details. QEMU (Quick EMUlator) emulates the various hardware components of a physical machine. Finally, libvirt provides the tools for creating and managing VMs. I use virt-manager and virsh as graphical and console interfaces respectively.
First, check whether the host computer’s CPU supports virtualization:
egrep -c '(vmx|svm)' /proc/cpuinfo
A result of 1 or more means the CPU supports virtualization extensions. A result of 0 means it does not, though double-check the BIOS and see if the extensions are available and just need to be enabled.
Install packages:
sudo apt install qemu-system-x86 libvirt-clients libvirt-daemon libvirt-daemon-system virtinst virt-manager bridge-utils
Add user (example name: foo) to the kvm, libvirt, and libvirt-qemu groups:
sudo adduser foo kvm
sudo adduser foo libvirt
sudo adduser foo libvirt-qemu
Log out and back in.
2. Directories
Default directory to hold VM images is /var/lib/libvirt/images.
Since I have root and home on separate partitions - and I have much more storage space in home - I create an images directory there, plus an isos directory to hold OS installers:
mkdir -p ~/var/lib/libvirt/{images,isos}
chown :kvm ~/var/lib/libvirt/images
sudo rmdir /var/lib/libvirt/images
Create symbolic links to these new (example: /home/foo) directories in /var/lib/libvirt:
sudo ln -s /home/foo/var/lib/libvirt/images /var/lib/libvirt/images
sudo ln -s /home/foo/var/lib/libvirt/isos /var/lib/libvirt/isos
3. Permissions
3.1 libvirt.conf
Create ~/.config/libvirt/libvirt.conf:
mkdir ~/.config/libvirt
sudo cp -rv /etc/libvirt/libvirt.conf ~/.config/libvirt/
sudo chown foo: ~/.config/libvirt/libvirt.conf
Open the file and set:
uri_default = "qemu:///system"
3.2 qemu.conf
For storage file permissions, open /etc/libvirt/qemu.conf and set the user to your username (example: foo) and group to libvirt-qeumu:
user = "foo"
group = "libvirt-qemu"
Start the libvirt service:
sudo systemctl start libvirtd
systemctl status libvirtd
4. Create VM
Create a VM by launching the virt-manager application.
Click the icon to add a new VM, and work through the series of dialog boxes to configure. Here I’ve created two: bullseye and mint:
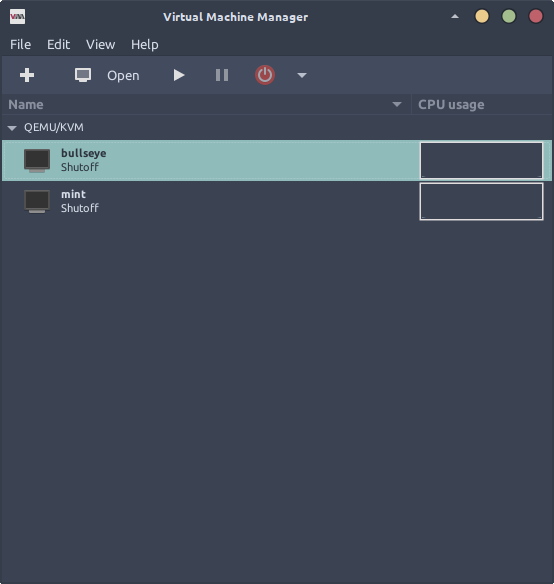
Note during the creation of a VM, the network selection option defaults to Virtual network 'default': NAT. If the default network is not active, virt-manager will prompt to start it.
Otherwise, start it manually with:
virsh net-start default
Each VM (in default network) will be a member of 192.168.122.0/24, with an IP address in the range of 192.168.122.2 to 192.168.122.254, and are accessible via SSH from the host.
5. Resize VM guest window
In the virt-manager console window, navigate to Edit->Preferences->Console and set:
Graphical console scalingtoAlwaysResize guest with windowtoOn
Inside a Debian/Mint/Ubuntu VM, install a spice agent:
sudo apt install spice-vdagent
Reboot the VM.
In the VM guest window, navigate to View->Scale display and check Always and Auto resize VM with window.
Now click-and-drag the window edge to resize display, or use xrandr to set display size.
6. Video acceleration
A Linux Mint VM in virt-manager complained about lack of video acceleration and was very slow.
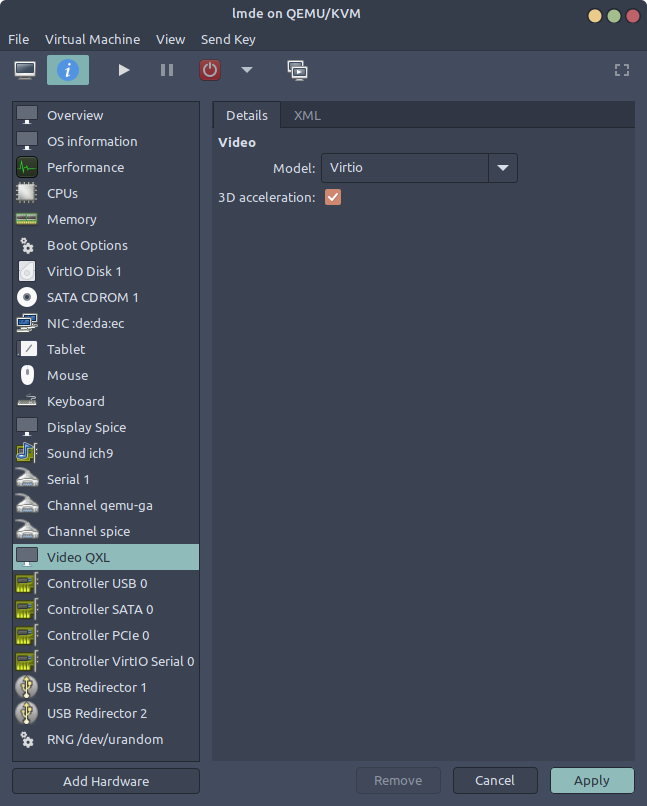
Using VirtIO its possible to create a virtual 3D accelerated GPU and pass through the hardware capabilities of the VM host’s graphic card (which, in my case, is integrated Intel graphics).
With the VM shutdown, open the VM hardware details window. Click on Video QXL and set Model: Virtio, check the box for 3D acceleration, and Apply the modifications.
Click on Display Spice, set Type: Spice Server and Listen type: None, check the box for OpenGL, and Apply the modifications.
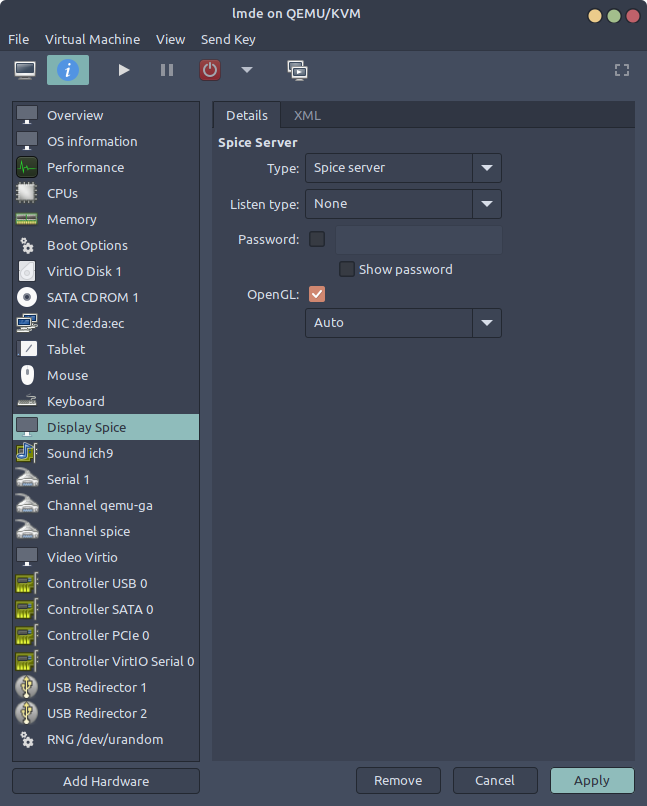
Start the VM. Much improved!
7. Virsh and virt-clone
Some useful commands:
- Start network:
virsh net-start <network_name> - List networks:
virsh net-list - List of VMs:
virsh list --all - Start, reboot, and shutdown VM:
virsh start <VM>,virsh reboot <VM>, andvirsh shutdown <VM> - Show IP addresses:
virsh net-dhcp-leases <network_name> - Clone VM and create storage image:
virt-clone -o <VM> -n <new_VM> -f /var/lib/libvirt/images/<new_VM>.qcow2
8. Resources
- Arch Linux Wiki: libvirt
- VirtIO 3D Acceleration
» Next: Install NetBSD (Short and Sweet Version)
« Previous: Roll your own FreeBSD Desktop Using Openbox